Hi there,
Recently I was trying to install and configure SharePoint server along with SQL Express 2008 R2. While configuring SharePoint server I was stuck with the error which said SharePoint server was not able to find the SQL Server. After a bit of googling i checked my DNS entries, checked SQL Server configuration and double checked the account access at SQL Server. I had to enable Named Pipe and TCP/IP protocols and eventually I landed out with the error saying, Not able to generate SSPI context. Obviously I didn't knew what the error was about and ended up with my old friend google again. After spending 3 long hours on this error without any luck, I went back to check the SQL Server settings. My SQL server was installed as a Default Instance and I don't know why I went ahead and uninstalled the SQL Server Instance and installed it again as a Named Instance this time and voila. Everything worked as a knife in butter and hence I was saved one more time :).
I dont understand what was the issue with the SQL Server Express being installed as a Default Instance, but yes I am going to look for the answer starting from now and will update the post soon.
Thats it for now,
and oh yess..this bolg is alive again..keep looking for more intresting things
P.S. If you already know the reason for this issue, please let me know. I am quite unaware of SQL deployments.
Wednesday, November 24, 2010
Saturday, February 13, 2010
Play Streaming Videos on SharePoint
As we all know that SharePoint 2007 can not play streaming Videos out-of-the box so i decided to find out a way by which you can stream videos on your MOSS 2007 site so i turned to my best friend... Google. I found a little material on the web where i came to know that to play streaming videos on the web you need a Streaming Server. So i decided to integrate SharePoint with a streaming Server. To play streaming videos Microsoft provides something called as Windows Media Services.Windows Media Services (WMS) is a streaming media server from Microsoft that allows an administrator to generate streaming media (audio/video). It is an update for Windows Server operating system. You can install it on your Windows Server 2003/2008 as a windows server role and then your server will be a Streaming Server.
Ok so after this introduction to Windows Media Services (WMS) let us move ahead and look at the steps to integrate SharePoint with WMS.
Once Windows Media Services is Installed open the Windows Media Services Manager.
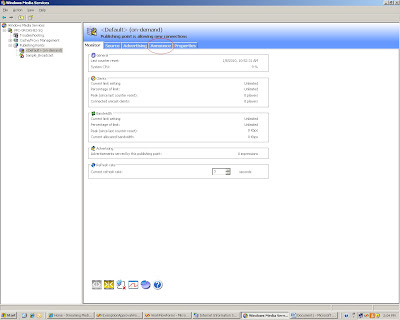
In the WMS Manager click the tab called Announce (using this you can create a Video Stream)
The media stream that WMS creates uses mms protocol the link that it will generate can be put directly in Windows Media Player to play the video stream but you can not store this link in SharePoint because the Link List in SharePoint only takes http protocol so we will run the Unicast Announcement Wizard which will create asx file which supports http protocol.
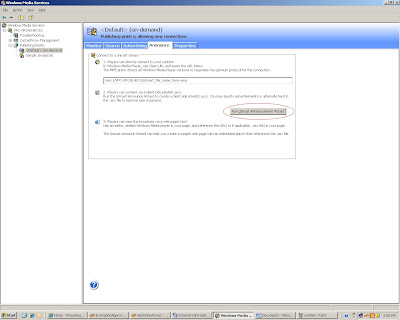
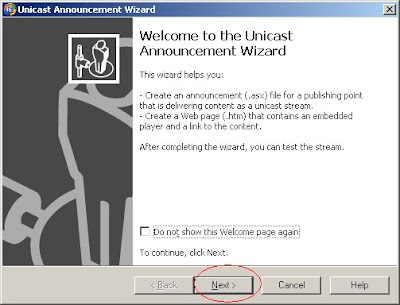
Clicking on the "Run Unicast Announcement Wizard" will start the Unicast Announcement Wizard. Click on Next
On the "On-Demand Directory" window click the browse button and select a video that you want to stream then click on Next
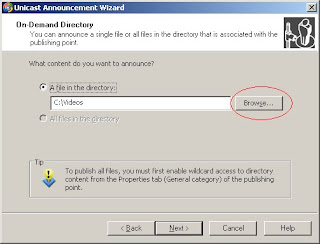
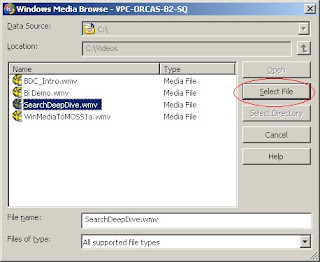
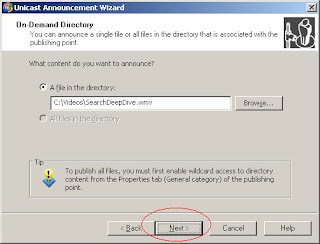
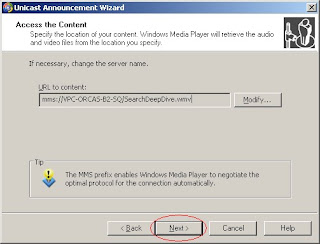
On the Access the Content Screen click on Next
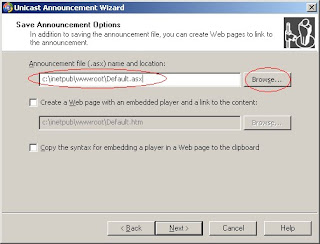
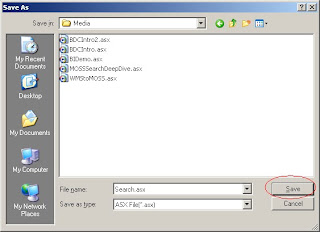
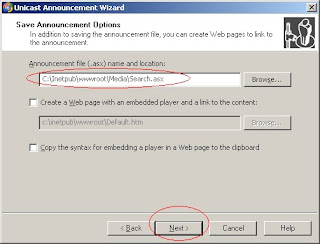
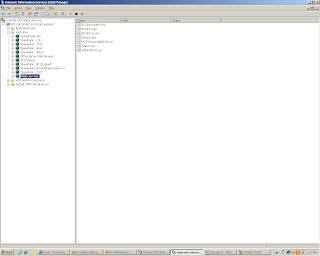
On the Save Announcement Option screen select the path where you want to save the announcement. I decided to save the asx file on an IIS web site so that i can get an hhtp link to that file. So i created a simple IIS website called Media Services and gave its physical path as "C:\Inetpub\wwwroot\Media" and saved the asx file on the same path
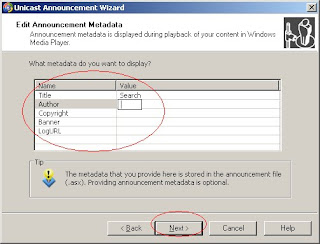
On the Edit Announcement Metadata page you add metadata to the asx file and then click Next
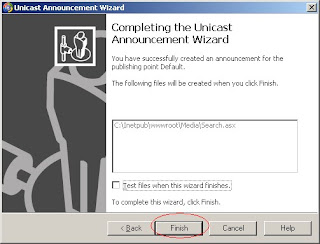
On the Complete Announcement Wizard Page click Finish.
Till now we have a Video Stream created but now we need a Video Player web part to play this stream on the SharePoint site.
So the next step is to create Media Player Web part. I created a simple webpart which embeds the Windows Media Player on the SharePoint page and takes the source parameter of the Video dynamically from the query string. The following is the code for the Media Player Web Part.
using System;
using System.Collections.Generic;
using System.Linq;
using System.Text;
using System.Web;
using Microsoft.SharePoint;
using System.Web.UI.WebControls.WebParts;
using System.Web.UI;
namespace MediaPlayerWebPart
{
public class MediaPlayer : WebPart
{
private string videoPath = string.Empty;
[WebBrowsable(true), Personalizable(true), WebDisplayName("Video Path")]
public string VideoPath
{
get
{
return ((this.videoPath == null) ? string.Empty : this.videoPath);
}
set
{
this.videoPath = value;
}
}
private string width = "192";
[WebBrowsable(true), Personalizable(true), WebDisplayName("Width")]
public string Width
{
get
{
return ((this.width == null) ? string.Empty : this.width);
}
set
{
this.width = value;
}
}
private string height = "190";
[WebBrowsable(true), Personalizable(true), WebDisplayName("Height")]
public string Height
{
get
{
return ((this.height == null) ? string.Empty : this.height);
}
set
{
this.height = value;
}
}
protected override void CreateChildControls()
{
//if(Page.Request.QueryString["VideoPath"] != null || Page.Request.QueryString["VideoPath"] != string.Empty)
if (Page.Request.QueryString["VideoPath"] != null)
{
videoPath = Page.Request.QueryString["VideoPath"].ToString();
}
this.Controls.Add(new LiteralControl("<body><OBJECT ID=\"MediaPlayer\" WIDTH=\"" + width + "\" HEIGHT=\"" + height + "\" CLASSID=\"CLSID:22D6F312-B0F6-11D0-94AB-0080C74C7E95\"STANDBY=\"Loading Windows Media Player components...\" TYPE=\"application/x-oleobject\"><PARAM NAME=\"FileName\" VALUE=\"" + videoPath + "\"><PARAM name=\"autostart\" VALUE=\"true\"> <PARAM name=\"ShowControls\" VALUE=\"true\"><param name=\"ShowStatusBar\" value=\"false\"><PARAM name=\"ShowDisplay\" VALUE=\"false\"><EMBED TYPE=\"application/x-mplayer2\" SRC=\"" + videoPath + "\" NAME=\"MediaPlayer\"WIDTH=\"192\" HEIGHT=\"190\" ShowControls=\"1\" ShowStatusBar=\"0\" ShowDisplay=\"0\" autostart=\"0\"> </EMBED> </OBJECT> </body>");
}
Next.. create a Links List on a SharePoint site and add the link to the asx file that we just created.
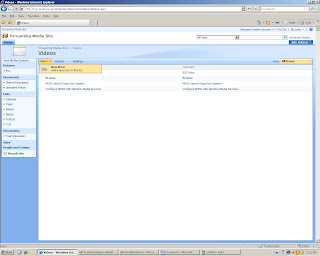
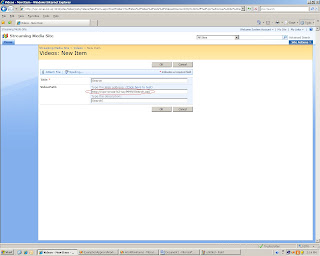
Once all this is done add the Media Player Web Part and a List View Web Part showing the list of videos on a SharePoint Web Part Page. For this PoC I added a DataView web part of this Links list which displayed the Name of the Video as a hyperlink to the same page with the url of the Video as the query string so that the Media Player Web Part picks up the source of the Video from the Query string and plays the Video.
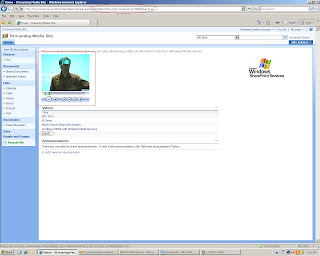
So here it is Video Streaming on SharePoint!!!
Now you can play videos from your Streaming Server directly on SharePoint.
Ok so after this introduction to Windows Media Services (WMS) let us move ahead and look at the steps to integrate SharePoint with WMS.
Once Windows Media Services is Installed open the Windows Media Services Manager.

In the WMS Manager click the tab called Announce (using this you can create a Video Stream)
The media stream that WMS creates uses mms protocol the link that it will generate can be put directly in Windows Media Player to play the video stream but you can not store this link in SharePoint because the Link List in SharePoint only takes http protocol so we will run the Unicast Announcement Wizard which will create asx file which supports http protocol.

Clicking on the "Run Unicast Announcement Wizard" will start the Unicast Announcement Wizard. Click on Next

On the "On-Demand Directory" window click the browse button and select a video that you want to stream then click on Next


On the Access the Content Screen click on Next

On the Save Announcement Option screen select the path where you want to save the announcement. I decided to save the asx file on an IIS web site so that i can get an hhtp link to that file. So i created a simple IIS website called Media Services and gave its physical path as "C:\Inetpub\wwwroot\Media" and saved the asx file on the same path


On the Edit Announcement Metadata page you add metadata to the asx file and then click Next

On the Complete Announcement Wizard Page click Finish.

Till now we have a Video Stream created but now we need a Video Player web part to play this stream on the SharePoint site.
So the next step is to create Media Player Web part. I created a simple webpart which embeds the Windows Media Player on the SharePoint page and takes the source parameter of the Video dynamically from the query string. The following is the code for the Media Player Web Part.
using System;
using System.Collections.Generic;
using System.Linq;
using System.Text;
using System.Web;
using Microsoft.SharePoint;
using System.Web.UI.WebControls.WebParts;
using System.Web.UI;
namespace MediaPlayerWebPart
{
public class MediaPlayer : WebPart
{
private string videoPath = string.Empty;
[WebBrowsable(true), Personalizable(true), WebDisplayName("Video Path")]
public string VideoPath
{
get
{
return ((this.videoPath == null) ? string.Empty : this.videoPath);
}
set
{
this.videoPath = value;
}
}
private string width = "192";
[WebBrowsable(true), Personalizable(true), WebDisplayName("Width")]
public string Width
{
get
{
return ((this.width == null) ? string.Empty : this.width);
}
set
{
this.width = value;
}
}
private string height = "190";
[WebBrowsable(true), Personalizable(true), WebDisplayName("Height")]
public string Height
{
get
{
return ((this.height == null) ? string.Empty : this.height);
}
set
{
this.height = value;
}
}
protected override void CreateChildControls()
{
//if(Page.Request.QueryString["VideoPath"] != null || Page.Request.QueryString["VideoPath"] != string.Empty)
if (Page.Request.QueryString["VideoPath"] != null)
{
videoPath = Page.Request.QueryString["VideoPath"].ToString();
}
this.Controls.Add(new LiteralControl("<body><OBJECT ID=\"MediaPlayer\" WIDTH=\"" + width + "\" HEIGHT=\"" + height + "\" CLASSID=\"CLSID:22D6F312-B0F6-11D0-94AB-0080C74C7E95\"STANDBY=\"Loading Windows Media Player components...\" TYPE=\"application/x-oleobject\"><PARAM NAME=\"FileName\" VALUE=\"" + videoPath + "\"><PARAM name=\"autostart\" VALUE=\"true\"> <PARAM name=\"ShowControls\" VALUE=\"true\"><param name=\"ShowStatusBar\" value=\"false\"><PARAM name=\"ShowDisplay\" VALUE=\"false\"><EMBED TYPE=\"application/x-mplayer2\" SRC=\"" + videoPath + "\" NAME=\"MediaPlayer\"WIDTH=\"192\" HEIGHT=\"190\" ShowControls=\"1\" ShowStatusBar=\"0\" ShowDisplay=\"0\" autostart=\"0\"> </EMBED> </OBJECT> </body>");
}
Next.. create a Links List on a SharePoint site and add the link to the asx file that we just created.


Once all this is done add the Media Player Web Part and a List View Web Part showing the list of videos on a SharePoint Web Part Page. For this PoC I added a DataView web part of this Links list which displayed the Name of the Video as a hyperlink to the same page with the url of the Video as the query string so that the Media Player Web Part picks up the source of the Video from the Query string and plays the Video.

So here it is Video Streaming on SharePoint!!!
Now you can play videos from your Streaming Server directly on SharePoint.
Tuesday, February 9, 2010
Configuring MOSS farm with cross domain WFE and Application Server
Hello there,
Recently we were trying to create a farm where we have a WFE (Web Front End) Server in a domain called Domain 2 and its MOSS Application Server in Domain 1. WFE is used to handle the Internet users whereas Application server is used to handle intranet users.
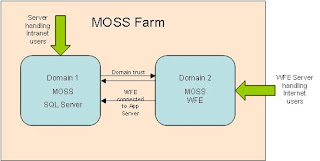
Here in this blog i will try to explain step by step process that we took in order to achieve the required topology and also will list all the gotchas that we faced. In our farm we used exclusively Windows Server 2008 R2 operating system for the reason that we believe in working on cutting edge. With this being said lets start with the configuration steps.
- Our first assumption is that we have two fully functional domains setup with all the required user accounts functional, viz a domain administrator account is needed for the time being at both the domains :)
- To Domain 1 add a Server box and install MOSS and SQL Server to it. If required MOSS and SQL server can be also in two different boxes, but we managed with a single box. Here take care that you install the required Servers with domain admin account or else later we would have to update farm administrator and add permissions to SQL Server. (Installation and configuration steps for MOSS and SQL Server are not covered).
- Now, establishing domain trust is required. For this purpose go to any of the DC machine and open Active Directory Domains and Trusts. But wait..... before this step go to you TCP/IPv4 properties in Network and Sharing Centre and add the other DNS server ip address in the alternate DNS field. By other DNS server i mean that the DNS server that the other DC is using. In our case we have configured DNS in the same box. Do this for both the DCs. Now in Active Directory Domains and Trusts right click on the listed domain and go to properties. Go to trust Tab and click New Trust. Select the the option mentioning two way trust. It should be noted that we can also create incoming and outgoing trust between domains can be set-up, but to be on the safer side we decided to create two way trust. In the wizard it will ask for domain administrator credentials, provide it and complete the wizard. Now the domain trust is created, we can cross check it by logging in to the other DC and check out the Active Directory Domains and Trust console.
- Now on Domain 2 add another box on which we will install MOSS with WFE role. Again in TCP/IPv4 properties of this box put the IP address of Domain 1 DNS in alternate DNS feild. Do the same for MOSS Server box. You will now notice that you can add users form Domain 1 into Domain 2. Add the domain admin (Domain1Admin-- account with which MOSS Server was configured) account of Domain 1 into Administrators group of WFE box. Log out and log in with the Domain1Admin account and start installing WFE role of MOSS in it. After installation run the SharePoint Product and Technologies Configuration Wizard. Select the option Add to an existing Farm. On next step give the SQL server name and click on Find Database button. Now this wizard will populate two thing for you. Config database and the farm administrator account. Verify that the farm administrator account is the account that you are logged in with. click next and finish the configuration wizard. If the wizard fails at step 2 then the possibility is that the Web application owner credentials does not match with the logged in account. Change those credentials from central admin and restart the configuration wizard at WFE end. After completing the wizard open the CA site at WFE.
- If the home page of CA shows that the WFE is not configured, go to Operations and Services on Server, there check that the Web Application Services has started on not... it might happen that its on Starting. To resolve this manually stop and start the service using stsadm command.
If you follow these 5 steps you will have fully functioning farm with required topology. Will evaluate the advantage and other challenges faced in functioning of this topology and soon update the blog. So keep checking.......
You can shoot me a mail if you have any queries regarding the blog or suggest any improvements in the blog.
Till then.... Enjoy SharePointing :)
Regards
Juzar Bharmal
MCP (SharePoint 3.0 Configuration and Development)
juzar30986@gmail.com
when going gets tough.... great ones party ;)
Labels:
cross domain,
farm,
farm topology,
MOSS,
SharePoint 2007,
WFE
Thursday, January 28, 2010
Problem in Uploading Slides To Slide Library in SharePoint 2010
Recently when i was trying to check out the new features of Slide Library in SharePoint 2010 i faced a problem while publishing slides to the Slide Library. here are the steps which i performed
1) Created the Slide Library
2) In the slide library i clicked on Upload -> Publish Slides and it opened PowerPoint on my machine (then i selected a PowerPoint Presentation to open and after that i seleced a few slides to be published)
3) After selecting the slides when i clicked on Publish button (on the Publish Slides Window) i got the following error
http:// is not accessible. Either this location does not exist or you might not have permission to use this network resource.
so i started googling it out. After searching alot on the net. I found other people facing the same issue. I did not find the solution to this problem but got a hint that this has something to do on the client side.
1st thing that you have to ensure that you have Office Professional PLUS installed on your client machine only then you can Publish your slides to SharePoint Slide Library. I already had Office Proessionl PLUS so this was not the problem. Also if you have this problem then you get a different error saying that "This feature requires Microsoft Office PowerPoint Professional". This message is a bit misleading as you actually require Professional PLUS for this to work.
Anyways comming back to my problem. I found that some of the integration features of Office client Applications and SharePoint work poperly only when you have WebClient service running on the client machine. For example features like
Opening a document library using Windows Explorer
Saving documents directly to ShaerPoint document library from withing Office Client Application.
The Operating Stsyem which i was using was Windows Server 2008 R2 (Standard). So i started searching for this WebClient Service to see if it was running or not. I went to Start->Administrative Tools->Services i browsed through all the services but could not find it. then i realised that had not installed the Desktop Experience feature on my Server (The WebClient service is installed only when you install the Desktop Experience feature on you Server 2008 machine). So i went ahead and installed the feature. Then i again checked the services and i as expected i saw the WebClient service so i started the service After that i tried to publish the slides again and it worked like a charm....Problem solved!!
So, as a summary here are the steps which i performe to solve the problem
1) Go to Start->Administrative Tools->Server Manager
2)In Server manager Click on Features and the click Add Features
3)Select the Desktop Experience Feature and install it. Then Restart the Server (Required for installation of the feature)
4)Go to Start->Administrative Tools->Services
5)Select the Web Client Service and Start it.
Following the above steps should solve your Problem. If you still face any problem please feel free to post a comment Ill try my best to solve it.
1) Created the Slide Library
2) In the slide library i clicked on Upload -> Publish Slides and it opened PowerPoint on my machine (then i selected a PowerPoint Presentation to open and after that i seleced a few slides to be published)
3) After selecting the slides when i clicked on Publish button (on the Publish Slides Window) i got the following error
http://
so i started googling it out. After searching alot on the net. I found other people facing the same issue. I did not find the solution to this problem but got a hint that this has something to do on the client side.
1st thing that you have to ensure that you have Office Professional PLUS installed on your client machine only then you can Publish your slides to SharePoint Slide Library. I already had Office Proessionl PLUS so this was not the problem. Also if you have this problem then you get a different error saying that "This feature requires Microsoft Office PowerPoint Professional". This message is a bit misleading as you actually require Professional PLUS for this to work.
Anyways comming back to my problem. I found that some of the integration features of Office client Applications and SharePoint work poperly only when you have WebClient service running on the client machine. For example features like
Opening a document library using Windows Explorer
Saving documents directly to ShaerPoint document library from withing Office Client Application.
The Operating Stsyem which i was using was Windows Server 2008 R2 (Standard). So i started searching for this WebClient Service to see if it was running or not. I went to Start->Administrative Tools->Services i browsed through all the services but could not find it. then i realised that had not installed the Desktop Experience feature on my Server (The WebClient service is installed only when you install the Desktop Experience feature on you Server 2008 machine). So i went ahead and installed the feature. Then i again checked the services and i as expected i saw the WebClient service so i started the service After that i tried to publish the slides again and it worked like a charm....Problem solved!!
So, as a summary here are the steps which i performe to solve the problem
1) Go to Start->Administrative Tools->Server Manager
2)In Server manager Click on Features and the click Add Features
3)Select the Desktop Experience Feature and install it. Then Restart the Server (Required for installation of the feature)
4)Go to Start->Administrative Tools->Services
5)Select the Web Client Service and Start it.
Following the above steps should solve your Problem. If you still face any problem please feel free to post a comment Ill try my best to solve it.
Labels:
Error,
MOSS,
SharePoint,
SharePoint 2010,
Slide Library
Friday, January 22, 2010
Error in Office Web Apps when installing on Domain Controller
I had installed SharePoint 2010 Public Beta (Farm Installation) on a Hyper-V machine with Windows Server 2008 R2 (Standard) as the OS and SQL Server 2008 R2 as my Database Server. I installed all the Pre-Requisites properly and the installation went really well and my SharePoint farm was fully configured and ready for use. Then i installed Office Web Apps and ran the configuration wizard without any errors.
Then i created a Team Site , turned on the Office Web Apps feature for the site collection. Till this point everything was absolutely fine. But then i uploaded a word document onto the site and tried to view it in the browser using the Office Web Apps. It took a long time to open and then finally gave me the following error “Word Web App cannot open this document because the server is still processing the document. Please try again later.”
Then i tried upload an Excel sheet and opend it in the browser. The excel opened without any problem which meant that there was no problem in the Excel Web Service. then i uploaded a PowerPoint presentation and opend it in the browser. It also gave me an error. It was quiet strange as the Office Web Applications had worked fine when i had installed SharePoint 2010 CTP version on a different machine.
After googling for a while i found Jie Li's Article which talked about installing Office Web Apps on a DC.
It turns out to be that if you are installing Office Web Apps on a machine which is a DC (Domain Controller) There are some extra steps which you need to perform in order to make Office Web Apps run properly.
If you are using Office Web Apps on DC you need to run the following shell script to make it work
$e = Get-SPServiceApplication | where {$_.TypeName.Equals("Word Viewing Service Application")}
$e.WordServerIsSandboxed = $false
$e.WordServerIsSandboxed
#(Please use the below script for PowerPointServiceApplication - You need to enter "Y" for the answer of each cmd)
Get-SPPowerPointServiceApplication | Set-SPPowerPointServiceApplication -EnableSandboxedViewing $false
Get-SPPowerPointServiceApplication | Set-SPPowerPointServiceApplication -EnableSandboxedEditing $false
So i ran the above commands and did an IIS reset and Issue Resolved. I was able to use Office Web Apps without any trouble.
Thursday, January 21, 2010
How To Upgrade to SharePoint 2010 using Database Attach method: Part 2
This is a Continuation of my previous post How To Upgrade to SharePoint 2010 using Database Attach method: Part 1 of my 2 Post series on How to Upgrade MOSS 2007 farm to SharePoint 2010 farm using Database attach method
In my previous post we covered all the steps which were to be performed on MOSS 2007 server. In this post we will cover the steps which are to be performed on SharePoint 2010 site.
The two steps which we covered in my previous post were
Step 1: Running Pre-Upgrade check command on the MOSS 2007 server, reviewing the report generated by it and fixing any issues which might be there in the farm
Step 2: Copying the Content database from MOSS 2007 server to SharePoint 2010 server.
Now we move to the 3rd Step..
Step 3: Create a new Web Application in SharePoint 2010. Once you will create a web application a content database will be attached to it, remove the database attached to the web application via Central Administration -> Application Management -> Manage Content Databases.
Make sure that no database is attached to the Web Application which you have just created.
Step 4: Run the Test-SPContentDatabase cmdlet (PowerShell).
Running this command will check if the database is ready for upgrade or not. This will tell you about the things which are missing in this farm (E.g. Any setup files, web parts etc.). You can either attend to these missing features pre or post-upgrade but this depends on whether there are any items that will block the upgrade from proceeding.
Syntax: Test-SPContentDatabase -Name-WebApplication
Step 5: Run the stsadm addcontentdb command to add the content Database to the web application which you created. This will initiate the upgrade process as shown in the screen below
Syntax: stsadm -o addcontentdb -url-databasename
Step 6: Review the Upgrade Log file and fix the errors.
The upgrade process generates two log files. (Under 14/LOGS)
The upgrade log file which contains all the information about the upgrade
The error log file which gives you the error which occurred during the upgrade
You can review the log files and fix the errors by manually upgrading the Customizations which were there in your site
Step 7: Upgrade Customizations
You have to manually upgrade the customizations. I decided to copy the customization after doing the upgrade as none of it was blocking the upgrade. If any of your customization is blocking the upgrade you will have to upgrade the customization first and then do the upgrade.
The customizations in this upgrade included the following things
–A custom Solution (wsp)
–2 custom Web Parts
–Custom Images (/_layouts/Images)
I added the solution to the farm solution store by using stsadm and then deployed it to my web application then I copied the Web Part assemblies to the GAC and added the Safe Control entries in the web.config file of my Web Application then I copied all the images used in my Web Application to appropriate places (like /14/TEMPLATE/IMAGES)
Once you have upgraded all the customizations your upgrade is complete.
There is one more Feature about which i would like to tell you is the Visual Upgrade feature. This feature gives you an option to switch between MOSS 2007 view of your Site and SharePoint 2010 view of your site after it has been upgraded.
Since your custom themes will not be upgraded Visual upgrade gives you an option to keep the MOSS 2007 view after you have upgraded the site to buy you some time to create new themes for your SharePoint 2010 site and once you are done creating the new theme you can switch to the new SharePoint 2010 view.
Following images show how the site looked after upgrade in MOSs 2007 view and SharePoint 2010 view.
Upgraded Site in MOSS 2007 View
Upgraded Site in SharePoint 2010 View
In my previous post we covered all the steps which were to be performed on MOSS 2007 server. In this post we will cover the steps which are to be performed on SharePoint 2010 site.
The two steps which we covered in my previous post were
Step 1: Running Pre-Upgrade check command on the MOSS 2007 server, reviewing the report generated by it and fixing any issues which might be there in the farm
Step 2: Copying the Content database from MOSS 2007 server to SharePoint 2010 server.
Now we move to the 3rd Step..
Step 3: Create a new Web Application in SharePoint 2010. Once you will create a web application a content database will be attached to it, remove the database attached to the web application via Central Administration -> Application Management -> Manage Content Databases.
Make sure that no database is attached to the Web Application which you have just created.
Step 4: Run the Test-SPContentDatabase cmdlet (PowerShell).
Running this command will check if the database is ready for upgrade or not. This will tell you about the things which are missing in this farm (E.g. Any setup files, web parts etc.). You can either attend to these missing features pre or post-upgrade but this depends on whether there are any items that will block the upgrade from proceeding.
Syntax: Test-SPContentDatabase -Name
Step 5: Run the stsadm addcontentdb command to add the content Database to the web application which you created. This will initiate the upgrade process as shown in the screen below
Syntax: stsadm -o addcontentdb -url
Step 6: Review the Upgrade Log file and fix the errors.
The upgrade process generates two log files. (Under 14/LOGS)
The upgrade log file which contains all the information about the upgrade
The error log file which gives you the error which occurred during the upgrade
You can review the log files and fix the errors by manually upgrading the Customizations which were there in your site
Step 7: Upgrade Customizations
You have to manually upgrade the customizations. I decided to copy the customization after doing the upgrade as none of it was blocking the upgrade. If any of your customization is blocking the upgrade you will have to upgrade the customization first and then do the upgrade.
The customizations in this upgrade included the following things
–A custom Solution (wsp)
–2 custom Web Parts
–Custom Images (/_layouts/Images)
I added the solution to the farm solution store by using stsadm and then deployed it to my web application then I copied the Web Part assemblies to the GAC and added the Safe Control entries in the web.config file of my Web Application then I copied all the images used in my Web Application to appropriate places (like /14/TEMPLATE/IMAGES)
Once you have upgraded all the customizations your upgrade is complete.
There is one more Feature about which i would like to tell you is the Visual Upgrade feature. This feature gives you an option to switch between MOSS 2007 view of your Site and SharePoint 2010 view of your site after it has been upgraded.
Since your custom themes will not be upgraded Visual upgrade gives you an option to keep the MOSS 2007 view after you have upgraded the site to buy you some time to create new themes for your SharePoint 2010 site and once you are done creating the new theme you can switch to the new SharePoint 2010 view.
Following images show how the site looked after upgrade in MOSs 2007 view and SharePoint 2010 view.
Upgraded Site in MOSS 2007 View
Upgraded Site in SharePoint 2010 View
Labels:
Database Attach Upgrade,
SharePoint 2010,
Upgrade
How To Upgrade to SharePoint 2010 using Database Attach method: Part 1
Hi.. Once SharePoint 2010 is launched one of the first things that people would want to know is how to upgrade their existing sites (on MOSS 2007) to SharePoint 2010. In my previous blog post i had shown the various methods which one can use to upgrade a MOSS 2007 farm to SharePoint 2010 farm. In this Blog post i am going to show you a step by step guide to upgrade your MOSS 2007 Web Application to SharePoint 2010 using the Database Attach approach.
I will explain this method in 2 Blog posts.
In Part 1 I am going to show you the steps which you need to perform before you start the upgrade like the pre upgrade check and reviwing the pre upgrade check report to make sure that your content database is ready for upgrade. In Part 2 i am going to show you the actual upgrade process.
Ok..so without any further delay....lets start!!
I upgraded a sample Web Application which i had created on MOSS 2007 to SharePoint 2010. So i will explain the steps using that Scenario.
But First let us take a look at the Pre-Requisites for Upgradation
Pre-Requisites
The Farm had One Web Application. A root Level Site Collection with around 10 sub sites and one of those subsites had 15 more subsites. Folloing diagram shows the structure of the Web Application.
Following were the customizations in the Portal
34 Custom Site Columns 27 Custom Content Types
2 Custom Web Parts
1 Custom 3rd Party Rating Solution
The following image shows how the Site looked before the Upgrade. As you can see there were a lot of customizations on to the site master page.
So let us now start with the upgrade process
Step 1: We have to run the Pre-Upgrade check command on the MOSS 2007 server to find out if there are any issues in the SharePoint 2007 farm (like missing site definitions, features etc.). Running the command will generate an html report for you. This report will not only notify you of any issues regarding your SharePoint farm such as missing Site Definition Information or missing Feature Information, but it also provides you with a blueprint of your SharePoint Farm setup
Some of the details that are provided by this report are
–Search content sources and start addresses
–Office Server Search topology
–Servers in the current farm
–SharePoint version and list of components
running in the farm
–Supported upgrade types
(Inplace Upgrade and Content Database Attach)
–Site Definition and Feature Information
–Language pack information
–Alternate Access Mappings (AAM)
that will need to be recreated
–Customized List views (these will not be upgraded)
–Customized field types (these will not be upgraded)
–WSS Search topology
-List of Content Databases and SQL server location
Syntax: stsadm –o preupgradecheck
After you have reviewed the report and fixed any issues which might be there in your farm you can move to the next step.
Step 2: Backup the content database of the Web Application from SQL Server. Copy it to the machine where SharePoint 2010 is installed and restore the backup of database in SQL Server using SQL Server Management Studio. To restore the backup you will first have to create an empty database in SQL Server and the restore your database one top of this new Database. While restoring make sure that the Overwrite the Existing Database option is checked (In the Options section....See image below)
At this point your database is checked for upgradation and transfered to the SharePoint 2010 farm. Now in the next steps we will start the Upgrade process on the SharePoint 2010 farm.
The next steps are in my next blog post How To Upgrade SharePoint 2010 using Database Attach method: Part 2
I will explain this method in 2 Blog posts.
In Part 1 I am going to show you the steps which you need to perform before you start the upgrade like the pre upgrade check and reviwing the pre upgrade check report to make sure that your content database is ready for upgrade. In Part 2 i am going to show you the actual upgrade process.
Ok..so without any further delay....lets start!!
I upgraded a sample Web Application which i had created on MOSS 2007 to SharePoint 2010. So i will explain the steps using that Scenario.
But First let us take a look at the Pre-Requisites for Upgradation
Pre-Requisites
- MOSS 2007 should have SP2 Installed. You should have SP2 installed on your MOSS 2007 machine. The preupgrade check command was added only in SP2. So if you do not have SP2 installed you will not have the preupgrade check command in stsadm.
- SharePoint 2010 should be set up on a different Server machine. This blog post will not show you how to set up SharePoint 2010 so you should have it installed and configured on a Machine. However if you want a guide on how to install SharePoint 2010 then you can refer to the following Blog Post SharePoint 2010 Installation Whole 9 yards!!!
The Farm had One Web Application. A root Level Site Collection with around 10 sub sites and one of those subsites had 15 more subsites. Folloing diagram shows the structure of the Web Application.
Following were the customizations in the Portal
34 Custom Site Columns 27 Custom Content Types
2 Custom Web Parts
1 Custom 3rd Party Rating Solution
- 1 Custom Field Type (Rating Field Type)
- 6 Custom Content Types
- 1 Custom Web Part
The following image shows how the Site looked before the Upgrade. As you can see there were a lot of customizations on to the site master page.
So let us now start with the upgrade process
Step 1: We have to run the Pre-Upgrade check command on the MOSS 2007 server to find out if there are any issues in the SharePoint 2007 farm (like missing site definitions, features etc.). Running the command will generate an html report for you. This report will not only notify you of any issues regarding your SharePoint farm such as missing Site Definition Information or missing Feature Information, but it also provides you with a blueprint of your SharePoint Farm setup
Some of the details that are provided by this report are
–Search content sources and start addresses
–Office Server Search topology
–Servers in the current farm
–SharePoint version and list of components
running in the farm
–Supported upgrade types
(Inplace Upgrade and Content Database Attach)
–Site Definition and Feature Information
–Language pack information
–Alternate Access Mappings (AAM)
that will need to be recreated
–Customized List views (these will not be upgraded)
–Customized field types (these will not be upgraded)
–WSS Search topology
-List of Content Databases and SQL server location
Syntax: stsadm –o preupgradecheck
After you have reviewed the report and fixed any issues which might be there in your farm you can move to the next step.
Step 2: Backup the content database of the Web Application from SQL Server. Copy it to the machine where SharePoint 2010 is installed and restore the backup of database in SQL Server using SQL Server Management Studio. To restore the backup you will first have to create an empty database in SQL Server and the restore your database one top of this new Database. While restoring make sure that the Overwrite the Existing Database option is checked (In the Options section....See image below)
At this point your database is checked for upgradation and transfered to the SharePoint 2010 farm. Now in the next steps we will start the Upgrade process on the SharePoint 2010 farm.
The next steps are in my next blog post How To Upgrade SharePoint 2010 using Database Attach method: Part 2
Labels:
Database Attach Upgrade,
SharePoint 2010,
Upgrade
Thursday, January 14, 2010
Upgrade Methods in SharePoint 2010: Part 2
This is the continuation of my previous post Upgrade Methods in SharePoint 2010: Part 1 In this post i am going to tell you about the 2 Hybrid Approaches that you can take for Upgrading your MOSS 2007 farm to a SharePoint 2010 farm.
Hybrid Approach 1
In this approach you can make the databases of your MOSS 2007 farm read only and then Install SharePoint 2010 ona different machine. Upgrade your MOSS 2007 farm using the Database Attach approach. (On the new SharePoint 2010 farm) and the redirect your users to the new upgraded farm. This will allow you to give read only access to the users while the farm is being upgraded so it will help you in downtime mitigation.
Here are the Pros/Cons for this approach
Pros
Hybrid Approach 2
In this approach you can detach your content databases and then do an In-Place upgrade once that is done you can attach the databases using the Database Attach approach. The benefit of this approach is that you can have the speed of the DB Attach upgrade and you can also keep your farm wide settings as you are upgrading the farm by using the In-Place upgrade.
Here are th Pros/Cons of this approach
Pros
If you are upgrading from WSS 3.0 to SharePoint Foundation 2010 you need to keep a few things in mind. SharePoint Foundation 2010 (used to be called Windows SharePoint Services v4) is no longer a part of Windows Server operating system, it will not use Windows Internal Database. It uses SQL Server Express. So if your WSS Internal database is more than 4GB it would pass the limitation of SQL Server Express.
Workaround: download FILESTREAM RBS Provider to put large blob objects on file system, store the rest like metadata, configuration in databases. In this way, the limitation of SQL Server Express can be bypassed. (but you should consider to move to other SQL Server editions as SQL Server Express is not the choices for scalability)
Hybrid Approach 1
In this approach you can make the databases of your MOSS 2007 farm read only and then Install SharePoint 2010 ona different machine. Upgrade your MOSS 2007 farm using the Database Attach approach. (On the new SharePoint 2010 farm) and the redirect your users to the new upgraded farm. This will allow you to give read only access to the users while the farm is being upgraded so it will help you in downtime mitigation.
Here are the Pros/Cons for this approach
Pros
- The existing farm can continue to host non-upgraded sites (in read-only mode) while you upgrade the content. As a result, there is minimal downtime for users
- You can upgrade multiple content databases at the same time, which results in faster upgrade times overall than an in-place upgrade
- You can upgrade hardware in addition to software
- The server and farm settings are not upgraded. You must manually transfer settings that you want to preserve from the old farm to the new farm
- Any customizations must also be transferred and upgraded manually
- Copying databases over a network takes time and bandwidth
- You need direct access to the database servers
Hybrid Approach 2
In this approach you can detach your content databases and then do an In-Place upgrade once that is done you can attach the databases using the Database Attach approach. The benefit of this approach is that you can have the speed of the DB Attach upgrade and you can also keep your farm wide settings as you are upgrading the farm by using the In-Place upgrade.
Here are th Pros/Cons of this approach
Pros
- Farmwide settings can be preserved and upgraded
- Customizations are available in the environment after upgrade
- You can upgrade multiple content databases at the same time
- Copying databases over a network takes time and bandwidth
- You need direct access to the database servers
- Existing hardware may need replacing
If you are upgrading from WSS 3.0 to SharePoint Foundation 2010 you need to keep a few things in mind. SharePoint Foundation 2010 (used to be called Windows SharePoint Services v4) is no longer a part of Windows Server operating system, it will not use Windows Internal Database. It uses SQL Server Express. So if your WSS Internal database is more than 4GB it would pass the limitation of SQL Server Express.
Workaround: download FILESTREAM RBS Provider to put large blob objects on file system, store the rest like metadata, configuration in databases. In this way, the limitation of SQL Server Express can be bypassed. (but you should consider to move to other SQL Server editions as SQL Server Express is not the choices for scalability)
Upgrade Methods in SharePoint 2010: Part 1
Hi everyone I will explain the upgrade methods in Sharepoint 2010 in a series of two posts. In the 1st one i will tell about the two methods available to you out-of-the-box and in the second post Upgrade Methods in SharePoint 2010: Part 2 i will tell about the two Hybrid approaches that you can take
In SharePoint 2010 there are two upgrade methods available.
There is also no direct upgrade method from SPS 2003 to SharePoint 2010. So if you want to upgrade from SPS 2003 to SharePoint 2010 you will have to upgrade SPS 2003 to MOSS 2007 and then from MOSS 2007 to ShaePoint 2010
Let us now have a look at both the available upgrade methods one by one
In-Place Upgrade
The InPlace upgrade is the easiest way to upgrade from MOSS 2007 to SharePoint 2010. In this approach you will install SharePoint 2010 on the same machine where MOSS 2007 was installed and the Upgrade wizzard will upgrade MOSS 2007 to SharePoint 2010. But make sure that you have run the pre-upgrade check before starting the upgrade to check all the pre-requisites are in place and all the errors are fixed.
Here are some of the features of InPlace Upgrade:
Pros
In database attach approach you install the SharePoint Server 2010 on a fresh Machine and you upgrade all the sites from your MOSS 2007 server by detaching the Content databases from MOSS Server and attaching them to the SharePoint 2010 server.
Here are some of the key features of Database Attach Upgrade method
Pros
In SharePoint 2010 there are two upgrade methods available.
- In-Place Upgrade
- Database Attach Upgrade
There is also no direct upgrade method from SPS 2003 to SharePoint 2010. So if you want to upgrade from SPS 2003 to SharePoint 2010 you will have to upgrade SPS 2003 to MOSS 2007 and then from MOSS 2007 to ShaePoint 2010
Let us now have a look at both the available upgrade methods one by one
In-Place Upgrade
The InPlace upgrade is the easiest way to upgrade from MOSS 2007 to SharePoint 2010. In this approach you will install SharePoint 2010 on the same machine where MOSS 2007 was installed and the Upgrade wizzard will upgrade MOSS 2007 to SharePoint 2010. But make sure that you have run the pre-upgrade check before starting the upgrade to check all the pre-requisites are in place and all the errors are fixed.
Here are some of the features of InPlace Upgrade:
- Very easy.. Wizard driven process. Click …Click ..finished
- The Previous version is overwritten
- All the sites are unavailable during upgrade
- Site visitors continue to use the same URLs after the upgrade
- Restartable: In the previous versions of SharePoint this upgrade process was not restartable but in SharePoint 2010 you can restart the upgrade process
- All Possible time-outs removed: In the previous versions if you used the Inplace upgrade a very big reason for the failure of upgrade was the time-out of one process or the other. Now all the possible time-outs have been removed to make this upgrade process more reliable
Pros
- Farmwide settings are preserved and upgraded.
- Customizations are available in the environment after the upgrade
- Servers and farms are offline while the upgrade is in progress
- The upgrade proceeds continuously
- After you begin an in-place upgrade, you cannot pause the upgrade or roll back to the previous version
In database attach approach you install the SharePoint Server 2010 on a fresh Machine and you upgrade all the sites from your MOSS 2007 server by detaching the Content databases from MOSS Server and attaching them to the SharePoint 2010 server.
Here are some of the key features of Database Attach Upgrade method
- SharePoint 2010 is installed on a fresh Server
- You can upgrade the databases in any order
- You can not upgrade any of the services or farm settings
- You can upgrade several databases at the same time
- Databases that can be Attached
- Content DB
- SSP DB
- Project DB
- Database that can not be attached
- Configuration DB
- Search DB
Pros
- You can upgrade multiple content databases at the same time, which results in faster upgrade times overall than an in-place upgrade
- You can use a database attach upgrade to combine multiple farms into one farm
- The server and farm settings are not upgraded. You must manually transfer settings that you want to preserve from the old farm to the new farm
- Any customizations must also be transferred to the new farm manually. Any missing customizations may cause unintended losses of functionality or user experience issues
- Copying databases over a network takes time and bandwidth
- You need direct access to the database servers
Error in crawling User Profiles in SharePoint 2010 Beta
While setting up Search in SharePoint 2010. I faced this problem that the user profile were not being crawled. I got the following error
“Error in Portal Crawl Web Service” when I checked the logs I got the following message
“PortalCrawl.GetSite(): System.UnauthorizedAccessException: Attempted to perform an unauthorized operation. At Microsoft.Office.Server.Administration.UserProfileApplicationProxy.DemandAdministrationAccess(UserProfileApplicationAdminRights rights) at Microsoft.SharePoint.Portal.Search.PortalCrawl.PortalCrawl.GetSite(_PortalSite& sSite).”
It seemed to be permission related issue so I opened the Central Admin site and checked the Permissions on the Search Service Application to make sure that my service account has permissions on the Service Application.
Then I went to the Web Application UserPolicy settings (Central Admin -> Security -> User Policy for Web application) and gave my Content access account full control on the Web Application which hosted my site. But after doing all this also I was not able to successful y crawl the User Profiles.
Then I went to Search Service Application -> Content sources and removed the path for User Profile crawl (“sps3://”) from “Local SharePoint Sites” content source and created a new content source called People. Then I changed the path for UserProfile crawl to include ’/my ’ . So now the new path that I added to the content source was “sps3:///my ” . I also changed the Crawl Settings from “Crawl everything under the hostname for each start address” to “Only crawl the Site Collection of each start address”.
Then I ran a full crawl and it worked :)
So now if you face a problem in crawling User Profiles in SHarePoint 2010 ..you know what to do.
“Error in Portal Crawl Web Service” when I checked the logs I got the following message
“PortalCrawl.GetSite(): System.UnauthorizedAccessException: Attempted to perform an unauthorized operation. At Microsoft.Office.Server.Administration.UserProfileApplicationProxy.DemandAdministrationAccess(UserProfileApplicationAdminRights rights) at Microsoft.SharePoint.Portal.Search.PortalCrawl.PortalCrawl.GetSite(_PortalSite& sSite).”
It seemed to be permission related issue so I opened the Central Admin site and checked the Permissions on the Search Service Application to make sure that my service account has permissions on the Service Application.
Then I went to the Web Application UserPolicy settings (Central Admin -> Security -> User Policy for Web application) and gave my Content access account full control on the Web Application which hosted my site. But after doing all this also I was not able to successful y crawl the User Profiles.
Then I went to Search Service Application -> Content sources and removed the path for User Profile crawl (“sps3://
Then I ran a full crawl and it worked :)
So now if you face a problem in crawling User Profiles in SHarePoint 2010 ..you know what to do.
Can not create MySite in SharePoint 2010
While creating MySite in SharePoint 2010 I got the following error
“Your personal site cannot be created. Contact your site administrator for more information”
I tried a lot of things to fix this error but nothing worked……
finally I decided to create the MySite Host from scratch and it worked like a charm.
Here are the steps which I performed:-
1. Create a Web Application
2. Delete the “sites” managed path
3. Create 2 managed paths
1. My – Explicit inclusion
2. Personal – wildcard inclusion
4. Create a site in the above created web application at location /my/ and choose the MySite Host template from Enterprise templates
5. Create a root site collection in the above created Web Application at location “/”. For enabling Self service site creation on that web application
6. Enable self service site creation on that web application
7. Go to Manage Service Applications -> User Profile Service Application and select Setup My Sites
8. Change the path in the My site host location to the new one which you have just created
9. Change the personal site path to “personal”
After doing this MySites should be created without any errors. I think this might be a bug in the Beta Version and will be fixed in the RTM.
I was not able to find the reason why the MySite Host which is created by SharePoint by default was not working but creating a new MySite host seems to solve the problem.
If anyone finds any other solution please feel free to share it with me.
Monday, January 4, 2010
SharePoint and LiveLink Integration: Part 2
This is a continuation of my previous post on SharePoint and LiveLink integration: Part1 where I described how to archive SharePoint documents to LiiveLink. In this post I will tell you how to search LiveLink data through SharePoint.
Searching Livelink Content from a SharePoint Site
The purpose of this is to create a Search Page in SharePoint site which will be used for searching and displaying search results from Livelink. The following steps will tell us how to do it.
Searching Livelink Content from a SharePoint Site
The purpose of this is to create a Search Page in SharePoint site which will be used for searching and displaying search results from Livelink. The following steps will tell us how to do it.
1. Create a web part page in SharePoint (e.g. LivelilkSearch.aspx)
2. Create a user control using Visual Studio 2005\2008 which will have a text box (to enter the query string) a search button(Which will call the Livelink search service and pass the query from text box to get the search results) and a gridview to show the Search Results from Livelink.
3. In your visual studio project add a web reference to the Livelink Search Service.
4. Add the code for the OnClick event of the search button to form the proper query string and pass it as a parameter to the ApplyQuery function of the Search service and get the results and show them in the GridView.
5. Add this user control as a web part(using SmartPart) on the Search page that we created. SharePoint and LiveLink Integration: Part 1
Sometime back i got a requirement for integrating LiveLink with SharePoint. The need was to search Livelink data through SharePoint interface and archive SharePoint documents to LiveLink. So i dicided to integrate the two using Web Services and was able to achieve the requirements successfully. So here is a blog post describing how you can integrate SharePoint 2007 with Livelink ECM.
Integrating SharePoint and Livelink using Web Services.
SharePoint can be integrated with Livelink Server though the Livelink Web Service .This uses standard HTTP protocol to communicate with the Livelink server. Livelink Web Services are installed on a Web Services application server, we do not have to install any Livelink software on the SharePoint Server or on the machine where we are building our applications. The following diagram shows how SharePoint can interact with Livelink through Livelink Web Services.
Archiving SharePoint Documents to Livelink
The purpose of this is to provide an “Archive to Livelink” option for documents stored in SharePoint sites and on click of that button the document will be archived to Livelink. The following steps tell us how to do it.
Step 1: Create a custom feature in SharePoint to add an extra item in the dropdown menu that comes when you click on any document. Specify the item name as “Archive to Livelink”
Step 2: Create a web part Page in SharePoint and Modify the above created feature to Point to this page when we click on the “Archive to Livelink” option
Step 3: Create a user control in Visual Studio 2005/2008 and add a web reference to the DocMan Web Service of Livelink. Use the ListObjects function of this web service to get the livelink folder structure (to allow users to select the folder in which they want to put the selected document). Then add this user control on the Web part page that we created in the previous step using SmartPart(This is a SharePoint web part which is used to add ASP.NET user controls on SharePoint sites. It is available as a free download on www.codeplex.com)
Note: I am creating user controls instead of web parts because it is easy to design the UI but the same thing can also be done by creating a web part.
Step 4: Create another user control in Visual Studio which uses the AddDocument(if file size is less than 1Mb) or AddDocumentSegmented(If file size is greater than 1Mb) function of the DocMan web service to copy a document to Livelink. The required parameters for the add document function are provided by query string and the above web part that we created. Add this user control to the same webpart page.
Step 5: Create a confirmation page (a web part page in SharePoint) to confirm that your document is archived or not after you click on the Archive button.
So this is one way of Integrating SharePoint with LiveLink using LiveLink web services. Same thing can be done using LiveLink APIs also.
Friday, January 1, 2010
Correlation ID (SharePoint 2010 Logging enhancements)
Correlation ID
Let me show you an example on how to use the Correlation ID in Sharepoint 2010.
While installing SharePoint at the final step where all the Service applications are set up (Using the Central Admin Configuration Wizard) I got an error that the Service Application proxy “User Profile Service Application” could not be provissioned and it had a Correlation ID with it.
So I copied the Correlation ID and opened the latest log file stored in the “14 Hive” in the LOGS folder and searched for that Correlation ID and found that the request to the UserProfile Web Service (https://://ProfilePropertyService.svc ) was being timed out .
So then I opened the IIS Manager and Opened the UserProfile Web service’s Web.Config file and increased the Binding timeout from 20 secs to 50 secs and then I again ran the Server Configuration Wizard from Central administration and this time the User Profile Service Application was configured properly without any error.
Labels:
CorrelationID,
SharePoint 2010,
SharePoint Logging
Installing SharePoint 2010 Whole 9 Yards!!!
SharePoint 2010 (Beta) is now out and available for public download on the Microsoft Site.
So here is a guide on how to install and configure it properly
Before you can start installing SharePoint 2010 on your machine. There are certain prerequisites which should be installed. Here is a list of software prerequisites for installing SharePoint 2010
Operating System (Only 64 bit editions are supported by SharePoint 2010)
For Windows Server 2008 with SP2, see FIX: A hotfix that provides a method to support the token authentication without transport security or message encryption in WCF is available for the .NET Framework 3.5 SP1 (http://go.microsoft.com/fwlink/?LinkID=160770).
For Windows Server 2008 R2, see FIX: A hotfix that provides a method to support the token authentication without transport security or message encryption in WCF is available for the .NET Framework 3.5 SP1
SQL Server
The 64-bit edition of Microsoft SQL Server 2005 with Service Pack 3 (SP3) with Cumulative update package 3 for SQL Server 2005 Service Pack 3 (http://go.microsoft.com/fwlink/?LinkId=165748).
The 64-bit edition of Microsoft SQL Server 2008 with Service Pack 1 (SP1) and Cumulative Update 2 installed with Cumulative update package 2 for SQL Server 2008 Service Pack 1 (http://go.microsoft.com/fwlink/?LinkId=165962). This cumulative update consists of two parts; ensure that you download both files. When you install Microsoft SQL Server 2008 SP1 on Windows Server 2008 R2, you might receive a compatibility warning. You can disregard this warning and continue with your installation
.NET Framework 3.5 SP1
Once you have installed the above mentioned softwares you can go ahead and start the installation of you SharePoint Server.
Step1 : Log in to the machine using a user who has Administrator rights. Open the folder where you have downloaded SharePoint Server 2010 (Beta) and double click on the OfficeServer.exe.
Step 2: Once you get the SharePoint 2010 installation screen Click on Install Software Pre-Requisites.
Note : Make sure that you have internet access because after clicking on Install Software Pre-Requisites the installer will install the pre-requisites from the Web.
Step 3: When the SharePoint Product and Technologies 2010 Preparation Wizard opens review the softwares that it will install and click Next.
Step 4: On the next Screen Accept the License Agreement and click next. The installation of pre Requisites will start and if everything goes well you will see the Installation Complete page. This means that we can now go ahead and install SharePoint.
Step 5: Restart your machine Open the folder where you downloaded SharePoint 2010 Beta and click on OfficeServer.exe and when the welcome screen opens click on “Install SharePoint Server”. Then on the next screen enter the Product Key and click Continue.
Step 6: On the next Screen Accept the License Agreement and Click Continue
Step 7: On the “Choose the Installation” page click on Server Farm.
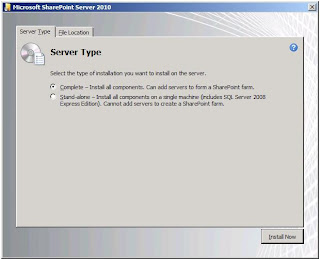
Step 8: On the “Server Type” page Select Complete and Click install now. The installation will start and when it is complete you will get the Run Configuration Wizard Page.
Step 9: On the Run Configuration Wizard page click close. The SharePoint Configuration Wizard should start.
Step 10: On the Configuration Wizard Screen Click Next. A pop up window will open and warn you that some services will be restarted. Click on Yes.
Step 11: On the ”Connect to Server Farm” Screen Select the “Create new Server Farm” option and Click Next.
Step 12: On the “Specify Database Settings” Screen type in the Database Server name and the Username Password of the database access account (This user should be the local admin and should also have the DbOwner and SecurityAdmin role in the SQL Server). (The Database name will be pre-populated) Then Click Next
Step 13: On the “Specify Farm Security Settings” screen type in the Passphrase. Note: This passphrase will have to be entered again if you are adding additional servers to this farm. Then click Next.
Step 14: On the “Configure SharePoint Central Administration Web Application” screen specify the port number on which you want to host your web application and select the Security settings (Kerberos/ NTLM) . Then click Next
Step 15: On the “Completing the SharePoint Products Configuration Wizard” Screen review the information and click next. The wizard will start the configuration of your SharePoint Server and once done you get a “Configuration Successful” screen. Click finish and your Central Administration site will open up in Internet Explorer.
Step 16: On the “Help make SharePoint Better” page select No and click OK.
Step 17: On the “How do you want to configure your SharePoint farm page” Select “Walk me through the settings….” Option and click next.
Note: This procedure can also be done at a later point by Selecting the Configuration Wizard Option in the QuickLaunch menu of Central Admin web site.
Step 18: On the next page in the Service Account Section either select an existing managed account or create a new one by specifying the credentials (This account should be present in AD). Then click Next. Now SharePoint will create all the Service Applications for you.
Step 19: Once all the Service Applications are created you will be redirected to the Create a site collection page. It is up to you to create a site collection or Skip this Step. I chose to Skip this step J. So click on Skip.
Step 20: You will then be redirected to the Configure your Server farm page which will show all the Services that are running on the Farm, you can review them and Click on Finish. Now your farm is fully installed and configured. So go ahead and dive into the world of SharePoint 2010.
Subscribe to:
Comments (Atom)


