Hi there,
Recently I was trying to install and configure SharePoint server along with SQL Express 2008 R2. While configuring SharePoint server I was stuck with the error which said SharePoint server was not able to find the SQL Server. After a bit of googling i checked my DNS entries, checked SQL Server configuration and double checked the account access at SQL Server. I had to enable Named Pipe and TCP/IP protocols and eventually I landed out with the error saying, Not able to generate SSPI context. Obviously I didn't knew what the error was about and ended up with my old friend google again. After spending 3 long hours on this error without any luck, I went back to check the SQL Server settings. My SQL server was installed as a Default Instance and I don't know why I went ahead and uninstalled the SQL Server Instance and installed it again as a Named Instance this time and voila. Everything worked as a knife in butter and hence I was saved one more time :).
I dont understand what was the issue with the SQL Server Express being installed as a Default Instance, but yes I am going to look for the answer starting from now and will update the post soon.
Thats it for now,
and oh yess..this bolg is alive again..keep looking for more intresting things
P.S. If you already know the reason for this issue, please let me know. I am quite unaware of SQL deployments.
Wednesday, November 24, 2010
Saturday, February 13, 2010
Play Streaming Videos on SharePoint
As we all know that SharePoint 2007 can not play streaming Videos out-of-the box so i decided to find out a way by which you can stream videos on your MOSS 2007 site so i turned to my best friend... Google. I found a little material on the web where i came to know that to play streaming videos on the web you need a Streaming Server. So i decided to integrate SharePoint with a streaming Server. To play streaming videos Microsoft provides something called as Windows Media Services.Windows Media Services (WMS) is a streaming media server from Microsoft that allows an administrator to generate streaming media (audio/video). It is an update for Windows Server operating system. You can install it on your Windows Server 2003/2008 as a windows server role and then your server will be a Streaming Server.
Ok so after this introduction to Windows Media Services (WMS) let us move ahead and look at the steps to integrate SharePoint with WMS.
Once Windows Media Services is Installed open the Windows Media Services Manager.
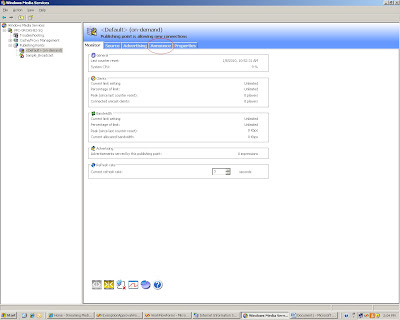
In the WMS Manager click the tab called Announce (using this you can create a Video Stream)
The media stream that WMS creates uses mms protocol the link that it will generate can be put directly in Windows Media Player to play the video stream but you can not store this link in SharePoint because the Link List in SharePoint only takes http protocol so we will run the Unicast Announcement Wizard which will create asx file which supports http protocol.
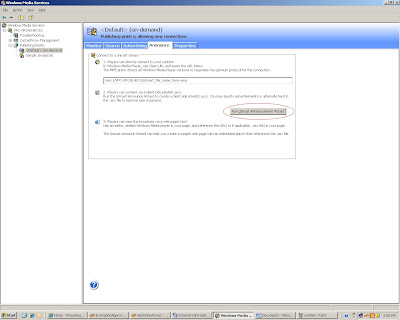
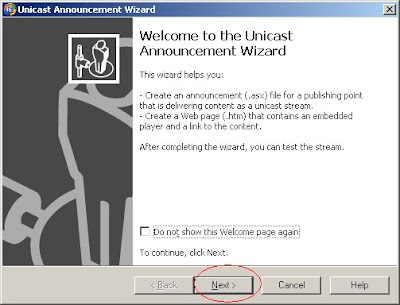
Clicking on the "Run Unicast Announcement Wizard" will start the Unicast Announcement Wizard. Click on Next
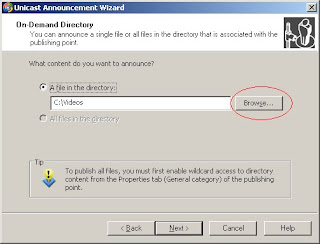
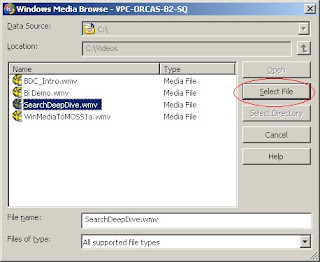
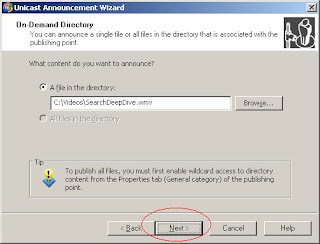
On the "On-Demand Directory" window click the browse button and select a video that you want to stream then click on Next
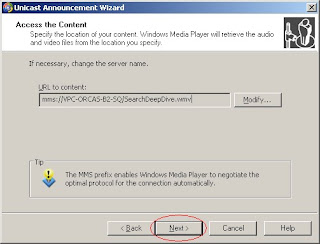
On the Access the Content Screen click on Next
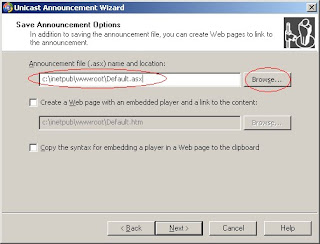
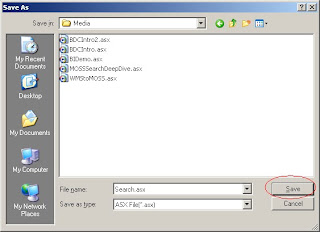
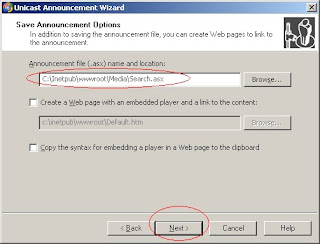
On the Save Announcement Option screen select the path where you want to save the announcement. I decided to save the asx file on an IIS web site so that i can get an hhtp link to that file. So i created a simple IIS website called Media Services and gave its physical path as "C:\Inetpub\wwwroot\Media" and saved the asx file on the same path

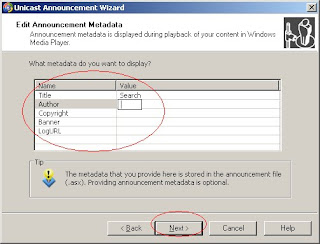
On the Edit Announcement Metadata page you add metadata to the asx file and then click Next
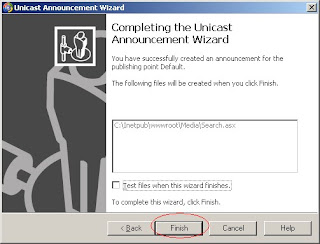
On the Complete Announcement Wizard Page click Finish.
Till now we have a Video Stream created but now we need a Video Player web part to play this stream on the SharePoint site.
So the next step is to create Media Player Web part. I created a simple webpart which embeds the Windows Media Player on the SharePoint page and takes the source parameter of the Video dynamically from the query string. The following is the code for the Media Player Web Part.
using System;
using System.Collections.Generic;
using System.Linq;
using System.Text;
using System.Web;
using Microsoft.SharePoint;
using System.Web.UI.WebControls.WebParts;
using System.Web.UI;
namespace MediaPlayerWebPart
{
public class MediaPlayer : WebPart
{
private string videoPath = string.Empty;
[WebBrowsable(true), Personalizable(true), WebDisplayName("Video Path")]
public string VideoPath
{
get
{
return ((this.videoPath == null) ? string.Empty : this.videoPath);
}
set
{
this.videoPath = value;
}
}
private string width = "192";
[WebBrowsable(true), Personalizable(true), WebDisplayName("Width")]
public string Width
{
get
{
return ((this.width == null) ? string.Empty : this.width);
}
set
{
this.width = value;
}
}
private string height = "190";
[WebBrowsable(true), Personalizable(true), WebDisplayName("Height")]
public string Height
{
get
{
return ((this.height == null) ? string.Empty : this.height);
}
set
{
this.height = value;
}
}
protected override void CreateChildControls()
{
//if(Page.Request.QueryString["VideoPath"] != null || Page.Request.QueryString["VideoPath"] != string.Empty)
if (Page.Request.QueryString["VideoPath"] != null)
{
videoPath = Page.Request.QueryString["VideoPath"].ToString();
}
this.Controls.Add(new LiteralControl("<body><OBJECT ID=\"MediaPlayer\" WIDTH=\"" + width + "\" HEIGHT=\"" + height + "\" CLASSID=\"CLSID:22D6F312-B0F6-11D0-94AB-0080C74C7E95\"STANDBY=\"Loading Windows Media Player components...\" TYPE=\"application/x-oleobject\"><PARAM NAME=\"FileName\" VALUE=\"" + videoPath + "\"><PARAM name=\"autostart\" VALUE=\"true\"> <PARAM name=\"ShowControls\" VALUE=\"true\"><param name=\"ShowStatusBar\" value=\"false\"><PARAM name=\"ShowDisplay\" VALUE=\"false\"><EMBED TYPE=\"application/x-mplayer2\" SRC=\"" + videoPath + "\" NAME=\"MediaPlayer\"WIDTH=\"192\" HEIGHT=\"190\" ShowControls=\"1\" ShowStatusBar=\"0\" ShowDisplay=\"0\" autostart=\"0\"> </EMBED> </OBJECT> </body>");
}
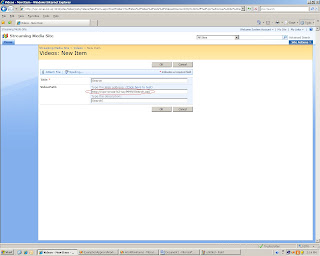
Next.. create a Links List on a SharePoint site and add the link to the asx file that we just created.
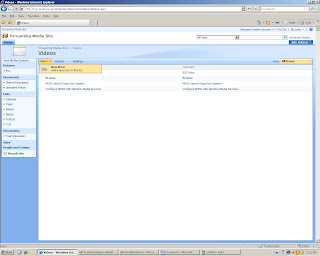
Once all this is done add the Media Player Web Part and a List View Web Part showing the list of videos on a SharePoint Web Part Page. For this PoC I added a DataView web part of this Links list which displayed the Name of the Video as a hyperlink to the same page with the url of the Video as the query string so that the Media Player Web Part picks up the source of the Video from the Query string and plays the Video.

So here it is Video Streaming on SharePoint!!!
Now you can play videos from your Streaming Server directly on SharePoint.
Ok so after this introduction to Windows Media Services (WMS) let us move ahead and look at the steps to integrate SharePoint with WMS.
Once Windows Media Services is Installed open the Windows Media Services Manager.
In the WMS Manager click the tab called Announce (using this you can create a Video Stream)
The media stream that WMS creates uses mms protocol the link that it will generate can be put directly in Windows Media Player to play the video stream but you can not store this link in SharePoint because the Link List in SharePoint only takes http protocol so we will run the Unicast Announcement Wizard which will create asx file which supports http protocol.

Clicking on the "Run Unicast Announcement Wizard" will start the Unicast Announcement Wizard. Click on Next

On the "On-Demand Directory" window click the browse button and select a video that you want to stream then click on Next


On the Access the Content Screen click on Next

On the Save Announcement Option screen select the path where you want to save the announcement. I decided to save the asx file on an IIS web site so that i can get an hhtp link to that file. So i created a simple IIS website called Media Services and gave its physical path as "C:\Inetpub\wwwroot\Media" and saved the asx file on the same path


On the Edit Announcement Metadata page you add metadata to the asx file and then click Next

On the Complete Announcement Wizard Page click Finish.

Till now we have a Video Stream created but now we need a Video Player web part to play this stream on the SharePoint site.
So the next step is to create Media Player Web part. I created a simple webpart which embeds the Windows Media Player on the SharePoint page and takes the source parameter of the Video dynamically from the query string. The following is the code for the Media Player Web Part.
using System;
using System.Collections.Generic;
using System.Linq;
using System.Text;
using System.Web;
using Microsoft.SharePoint;
using System.Web.UI.WebControls.WebParts;
using System.Web.UI;
namespace MediaPlayerWebPart
{
public class MediaPlayer : WebPart
{
private string videoPath = string.Empty;
[WebBrowsable(true), Personalizable(true), WebDisplayName("Video Path")]
public string VideoPath
{
get
{
return ((this.videoPath == null) ? string.Empty : this.videoPath);
}
set
{
this.videoPath = value;
}
}
private string width = "192";
[WebBrowsable(true), Personalizable(true), WebDisplayName("Width")]
public string Width
{
get
{
return ((this.width == null) ? string.Empty : this.width);
}
set
{
this.width = value;
}
}
private string height = "190";
[WebBrowsable(true), Personalizable(true), WebDisplayName("Height")]
public string Height
{
get
{
return ((this.height == null) ? string.Empty : this.height);
}
set
{
this.height = value;
}
}
protected override void CreateChildControls()
{
//if(Page.Request.QueryString["VideoPath"] != null || Page.Request.QueryString["VideoPath"] != string.Empty)
if (Page.Request.QueryString["VideoPath"] != null)
{
videoPath = Page.Request.QueryString["VideoPath"].ToString();
}
this.Controls.Add(new LiteralControl("<body><OBJECT ID=\"MediaPlayer\" WIDTH=\"" + width + "\" HEIGHT=\"" + height + "\" CLASSID=\"CLSID:22D6F312-B0F6-11D0-94AB-0080C74C7E95\"STANDBY=\"Loading Windows Media Player components...\" TYPE=\"application/x-oleobject\"><PARAM NAME=\"FileName\" VALUE=\"" + videoPath + "\"><PARAM name=\"autostart\" VALUE=\"true\"> <PARAM name=\"ShowControls\" VALUE=\"true\"><param name=\"ShowStatusBar\" value=\"false\"><PARAM name=\"ShowDisplay\" VALUE=\"false\"><EMBED TYPE=\"application/x-mplayer2\" SRC=\"" + videoPath + "\" NAME=\"MediaPlayer\"WIDTH=\"192\" HEIGHT=\"190\" ShowControls=\"1\" ShowStatusBar=\"0\" ShowDisplay=\"0\" autostart=\"0\"> </EMBED> </OBJECT> </body>");
}
Next.. create a Links List on a SharePoint site and add the link to the asx file that we just created.


Once all this is done add the Media Player Web Part and a List View Web Part showing the list of videos on a SharePoint Web Part Page. For this PoC I added a DataView web part of this Links list which displayed the Name of the Video as a hyperlink to the same page with the url of the Video as the query string so that the Media Player Web Part picks up the source of the Video from the Query string and plays the Video.

So here it is Video Streaming on SharePoint!!!
Now you can play videos from your Streaming Server directly on SharePoint.
Tuesday, February 9, 2010
Configuring MOSS farm with cross domain WFE and Application Server
Hello there,
Recently we were trying to create a farm where we have a WFE (Web Front End) Server in a domain called Domain 2 and its MOSS Application Server in Domain 1. WFE is used to handle the Internet users whereas Application server is used to handle intranet users.

Here in this blog i will try to explain step by step process that we took in order to achieve the required topology and also will list all the gotchas that we faced. In our farm we used exclusively Windows Server 2008 R2 operating system for the reason that we believe in working on cutting edge. With this being said lets start with the configuration steps.
- Our first assumption is that we have two fully functional domains setup with all the required user accounts functional, viz a domain administrator account is needed for the time being at both the domains :)
- To Domain 1 add a Server box and install MOSS and SQL Server to it. If required MOSS and SQL server can be also in two different boxes, but we managed with a single box. Here take care that you install the required Servers with domain admin account or else later we would have to update farm administrator and add permissions to SQL Server. (Installation and configuration steps for MOSS and SQL Server are not covered).
- Now, establishing domain trust is required. For this purpose go to any of the DC machine and open Active Directory Domains and Trusts. But wait..... before this step go to you TCP/IPv4 properties in Network and Sharing Centre and add the other DNS server ip address in the alternate DNS field. By other DNS server i mean that the DNS server that the other DC is using. In our case we have configured DNS in the same box. Do this for both the DCs. Now in Active Directory Domains and Trusts right click on the listed domain and go to properties. Go to trust Tab and click New Trust. Select the the option mentioning two way trust. It should be noted that we can also create incoming and outgoing trust between domains can be set-up, but to be on the safer side we decided to create two way trust. In the wizard it will ask for domain administrator credentials, provide it and complete the wizard. Now the domain trust is created, we can cross check it by logging in to the other DC and check out the Active Directory Domains and Trust console.
- Now on Domain 2 add another box on which we will install MOSS with WFE role. Again in TCP/IPv4 properties of this box put the IP address of Domain 1 DNS in alternate DNS feild. Do the same for MOSS Server box. You will now notice that you can add users form Domain 1 into Domain 2. Add the domain admin (Domain1Admin-- account with which MOSS Server was configured) account of Domain 1 into Administrators group of WFE box. Log out and log in with the Domain1Admin account and start installing WFE role of MOSS in it. After installation run the SharePoint Product and Technologies Configuration Wizard. Select the option Add to an existing Farm. On next step give the SQL server name and click on Find Database button. Now this wizard will populate two thing for you. Config database and the farm administrator account. Verify that the farm administrator account is the account that you are logged in with. click next and finish the configuration wizard. If the wizard fails at step 2 then the possibility is that the Web application owner credentials does not match with the logged in account. Change those credentials from central admin and restart the configuration wizard at WFE end. After completing the wizard open the CA site at WFE.
- If the home page of CA shows that the WFE is not configured, go to Operations and Services on Server, there check that the Web Application Services has started on not... it might happen that its on Starting. To resolve this manually stop and start the service using stsadm command.
If you follow these 5 steps you will have fully functioning farm with required topology. Will evaluate the advantage and other challenges faced in functioning of this topology and soon update the blog. So keep checking.......
You can shoot me a mail if you have any queries regarding the blog or suggest any improvements in the blog.
Till then.... Enjoy SharePointing :)
Regards
Juzar Bharmal
MCP (SharePoint 3.0 Configuration and Development)
juzar30986@gmail.com
when going gets tough.... great ones party ;)
Thursday, January 28, 2010
Problem in Uploading Slides To Slide Library in SharePoint 2010
Recently when i was trying to check out the new features of Slide Library in SharePoint 2010 i faced a problem while publishing slides to the Slide Library. here are the steps which i performed
1) Created the Slide Library
2) In the slide library i clicked on Upload -> Publish Slides and it opened PowerPoint on my machine (then i selected a PowerPoint Presentation to open and after that i seleced a few slides to be published)
3) After selecting the slides when i clicked on Publish button (on the Publish Slides Window) i got the following error
http:// is not accessible. Either this location does not exist or you might not have permission to use this network resource.
so i started googling it out. After searching alot on the net. I found other people facing the same issue. I did not find the solution to this problem but got a hint that this has something to do on the client side.
1st thing that you have to ensure that you have Office Professional PLUS installed on your client machine only then you can Publish your slides to SharePoint Slide Library. I already had Office Proessionl PLUS so this was not the problem. Also if you have this problem then you get a different error saying that "This feature requires Microsoft Office PowerPoint Professional". This message is a bit misleading as you actually require Professional PLUS for this to work.
Anyways comming back to my problem. I found that some of the integration features of Office client Applications and SharePoint work poperly only when you have WebClient service running on the client machine. For example features like
Opening a document library using Windows Explorer
Saving documents directly to ShaerPoint document library from withing Office Client Application.
The Operating Stsyem which i was using was Windows Server 2008 R2 (Standard). So i started searching for this WebClient Service to see if it was running or not. I went to Start->Administrative Tools->Services i browsed through all the services but could not find it. then i realised that had not installed the Desktop Experience feature on my Server (The WebClient service is installed only when you install the Desktop Experience feature on you Server 2008 machine). So i went ahead and installed the feature. Then i again checked the services and i as expected i saw the WebClient service so i started the service After that i tried to publish the slides again and it worked like a charm....Problem solved!!
So, as a summary here are the steps which i performe to solve the problem
1) Go to Start->Administrative Tools->Server Manager
2)In Server manager Click on Features and the click Add Features
3)Select the Desktop Experience Feature and install it. Then Restart the Server (Required for installation of the feature)
4)Go to Start->Administrative Tools->Services
5)Select the Web Client Service and Start it.
Following the above steps should solve your Problem. If you still face any problem please feel free to post a comment Ill try my best to solve it.
1) Created the Slide Library
2) In the slide library i clicked on Upload -> Publish Slides and it opened PowerPoint on my machine (then i selected a PowerPoint Presentation to open and after that i seleced a few slides to be published)
3) After selecting the slides when i clicked on Publish button (on the Publish Slides Window) i got the following error
http://
so i started googling it out. After searching alot on the net. I found other people facing the same issue. I did not find the solution to this problem but got a hint that this has something to do on the client side.
1st thing that you have to ensure that you have Office Professional PLUS installed on your client machine only then you can Publish your slides to SharePoint Slide Library. I already had Office Proessionl PLUS so this was not the problem. Also if you have this problem then you get a different error saying that "This feature requires Microsoft Office PowerPoint Professional". This message is a bit misleading as you actually require Professional PLUS for this to work.
Anyways comming back to my problem. I found that some of the integration features of Office client Applications and SharePoint work poperly only when you have WebClient service running on the client machine. For example features like
Opening a document library using Windows Explorer
Saving documents directly to ShaerPoint document library from withing Office Client Application.
The Operating Stsyem which i was using was Windows Server 2008 R2 (Standard). So i started searching for this WebClient Service to see if it was running or not. I went to Start->Administrative Tools->Services i browsed through all the services but could not find it. then i realised that had not installed the Desktop Experience feature on my Server (The WebClient service is installed only when you install the Desktop Experience feature on you Server 2008 machine). So i went ahead and installed the feature. Then i again checked the services and i as expected i saw the WebClient service so i started the service After that i tried to publish the slides again and it worked like a charm....Problem solved!!
So, as a summary here are the steps which i performe to solve the problem
1) Go to Start->Administrative Tools->Server Manager
2)In Server manager Click on Features and the click Add Features
3)Select the Desktop Experience Feature and install it. Then Restart the Server (Required for installation of the feature)
4)Go to Start->Administrative Tools->Services
5)Select the Web Client Service and Start it.
Following the above steps should solve your Problem. If you still face any problem please feel free to post a comment Ill try my best to solve it.
Subscribe to:
Posts (Atom)